105 Tag All
Chris McKeown / July 1, 2025
Time Saving
Overview
Tag All lets you place tags on every element of a chosen category across multiple views at once. Select a category, pick the tag family, tick the families or element types you want to tag, choose one or more views, and click Tag All — the tool skips elements that are already tagged and reports a full count at the end. It supports tagging into Revit-linked files and works with Rooms, Spaces, Areas, and any other taggable category.
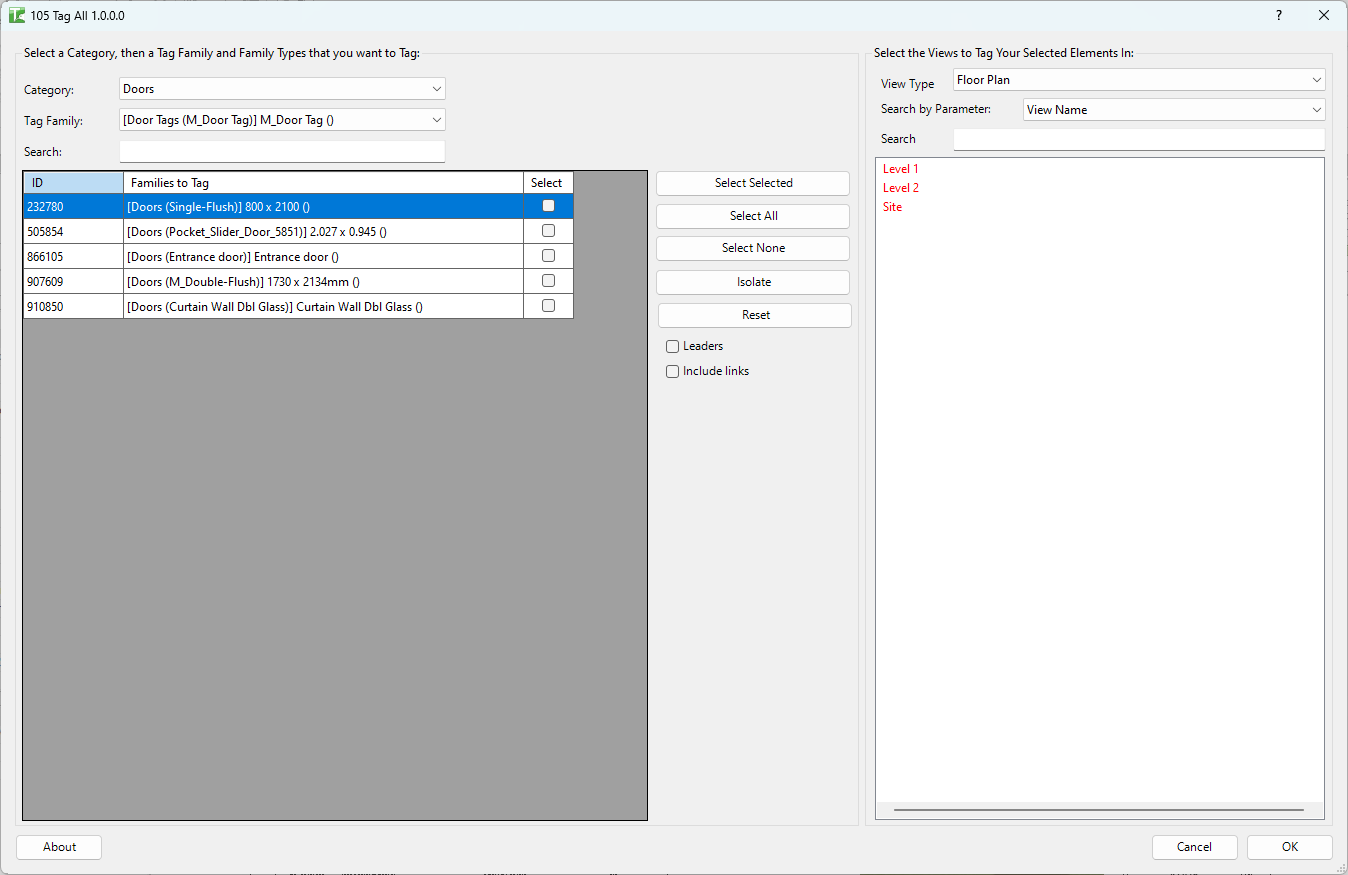
Table of Contents
Key Features
- Tags all untagged elements of a category across any number of views in one transaction
- Skips elements already tagged with the selected tag family — no duplicate tags
- Category dropdown populated from the live project, covering every taggable category
- Tag Family dropdown automatically filtered to only show tags compatible with the selected category
- Search box on both the families list and the views list for rapid filtering
- Views already placed on sheets are shown in red so you can easily target or avoid them
- Filter views by View Type and any view parameter (defaults to View Name)
- Include links checkbox extends tagging to elements in Revit-linked files
- Leaders checkbox controls whether tags are placed with a leader line
- Isolate button hides unchecked family rows so you can focus on your selection
- Progress bar with cancel support — stops cleanly mid-run without committing partial changes
- Dialog settings (category, tag, view type, search parameter) are saved and restored between sessions
Requirements
- Must be run from a Project document — not available in Family Editor
- Tag Family types matching the selected category must exist in the project
- For areas tagging, the selected views must be
ViewPlantype (Area Plans) - Elements in linked files can only be tagged when Include links is enabled and link instances are loaded
Running the Tool
Launch
Find Tag All on the Bonus Tools Ribbon or use 115 Search Tools.
The dialog opens with two panels side by side: the Families panel on the left and the Views panel on the right.

Step 1 — Select a Category
Open the Category dropdown and choose the category of elements you want to tag (e.g. Doors, Rooms, Mechanical Equipment).

The dropdown is populated from every category present in the project. Changing the category immediately refreshes both the Tag Family dropdown and the Families to Tag grid below.
For Rooms, Spaces, and Areas the families grid displays instances (individual rooms/spaces/areas) rather than types, with their number, name, department, and level shown for easy identification.
Step 2 — Choose a Tag Family
Open the Tag Family dropdown and select the tag family type to use.

The list is pre-filtered to only show tag families whose category name matches the selected category, so irrelevant tags do not appear.
Step 3 — Select Families / Element Types to Tag
The Families to Tag grid lists all element types (or instances for Rooms/Spaces/Areas) in the selected category. Tick the Select checkbox on each row you want to tag.

Use the toolbar buttons to manage your selection:
| Button | Action |
|---|---|
| Select Selected | Toggles the checkbox on all highlighted (blue) rows |
| Select All | Checks every row in the grid |
| Select None | Unchecks every row |
| Isolate | Removes all unchecked rows from the grid so only your selection is visible |
| Reset | Restores the full list from the project |
Use the Search box above the grid to filter rows by name — useful for large projects with many family types.
Include linked files
Enable Include links to also list elements from loaded Revit-linked files. Linked items are labelled with (Link) after their name so they are easy to identify.
Step 4 — Filter and Select Views
Use the right-hand panel to select the views where tags will be placed.

Filter controls:
| Control | Purpose |
|---|---|
| View Type | Narrows the list to a specific view family type (e.g. Floor Plan, Section). Select All to show every view type. |
| Search by Parameter | Chooses which view parameter is searched when you type in the Search box. Defaults to View Name. |
| Search | Filters the views list in real time as you type. |
In the views list, red text indicates views that are currently placed on a sheet. This lets you quickly identify views that are part of a drawing set.
Select one or more views using standard click, Shift-click, or Ctrl-click.
Step 5 — Set Tag Options
Before running, check the two options in the Families panel header:
- Leaders — when enabled, each new tag is placed with a leader line pointing back to the element.
- Include links — when enabled, elements from linked files are included (see Step 3).
Step 6 — Run Tag All
Click Tag All to begin. A progress bar appears showing how many views have been processed. Click Cancel in the progress bar at any time to abort — no tags are committed if you cancel.

When complete, a summary message appears:
X tags added. Y tags failed. Z tags already added.
Each tagged element is also logged to the Bonus Tools output window with its name shown in green (tagged), grey (already tagged), or red (failed).
Tips and Best Practices
- Run on a filtered view selection. Rather than selecting all views, narrow the list using the View Type and Search controls. Tagging hundreds of views at once on a large project can be slow.
- Use "Select None" then cherry-pick. If you only need to tag a handful of family types, start with Select None, then manually check the rows you want — faster than unchecking the rest.
- Check red views deliberately. Views shown in red are already on sheets, meaning their tags may be visible to end users. Tagging these intentionally is fine, but tagging them accidentally during a bulk run is easy to miss.
- Isolate before tagging. After checking the families you want, click Isolate to remove the unchecked rows. This gives you a clean visual confirmation of your exact selection before committing.
- Leaders add clutter in dense views. Leave Leaders off unless the view is sparse or the elements are too small to tag without a pointer. Leaders can be added manually afterwards if needed.
- Linked file tagging requires the link to be loaded. If the link is unloaded, the linked elements will not appear in the grid even with Include links enabled. Load the link and re-open the tool.
- The tool remembers your last settings. Category, tag family, view type, and search parameter are restored on next open, so repeat runs of the same tagging operation are quick.
Common Use Cases
Tagging all doors on multiple floor plans — Select the Doors category, choose the appropriate door tag family, tick all door types in the grid, select all Floor Plan views, and click Tag All. All untagged door instances are tagged in one pass.
Room tagging across a full project — Select the Rooms category. Each room instance (number, name, department, level) appears in the grid. Check every room or use Select All, choose all Floor Plan views, and click Tag All. Rooms already carrying the selected tag are skipped automatically.
Tagging elements in linked files — Enable Include links, select the category, and linked elements appear in the grid labelled with (Link). Tag them the same way as host elements — the tool handles the Revit API link reference internally.
Updating tags after a design change — New elements added since the last tagging run are untagged. Re-run Tag All with the same settings; previously tagged elements are skipped, and only the new ones receive tags.
Targeting only sheet views — Use the views list to select only views shown in red (already on sheets). This focuses the tagging run on drawings that are part of the current issue set.
Troubleshooting
"Action not available in the Family Environment" Tag All cannot run from inside a Family Editor document. Open a Project file and try again.
"Error Getting Tag Family" The selected tag in the Tag Family dropdown could not be retrieved from the project. This can happen if the family was deleted after the dialog opened. Close the tool, verify the tag family exists in the project, and re-open.
"No Symbols Were Selected to Tag" No rows in the Families to Tag grid have the Select checkbox ticked. Check at least one row and try again.
"No Views Were Selected to Tag Elements In" No views are highlighted in the views list. Click one or more views to select them, then click Tag All.
"Tag All failed. Gain ownership of elements and try again." This occurs in a workshared (Revit Server / BIM 360) project when you do not own the elements or views being modified. Synchronise with central, borrow the relevant worksets, and run the tool again.
Tags placed but nothing visible in the view The tag may have been placed outside the view's crop region, or the tag category may be hidden in the view. Check View → Visibility/Graphics and ensure the tag category is visible. Tags can also land at the exact element origin, which may be outside a cropped floor plan.
Linked elements not appearing in the grid Ensure the linked file is loaded (not unloaded or missing) and that Include links is checked. If the link was loaded after the dialog opened, close and re-open the tool to refresh the list.
Tag family dropdown is empty No tag families exist in the project for the selected category. Load the appropriate tag family from the Revit library or your company template, then re-run the tool.
Progress bar appears but no tags are created This can happen if every element in the selected views is already tagged with the chosen tag family. Check the output window — entries shown in grey indicate elements that were skipped as already tagged. Change the tag family or clear existing tags if re-tagging is intended.