064 Floor to Follow Topography
Chris McKeown / July 1, 2025
Topography Tools
Overview
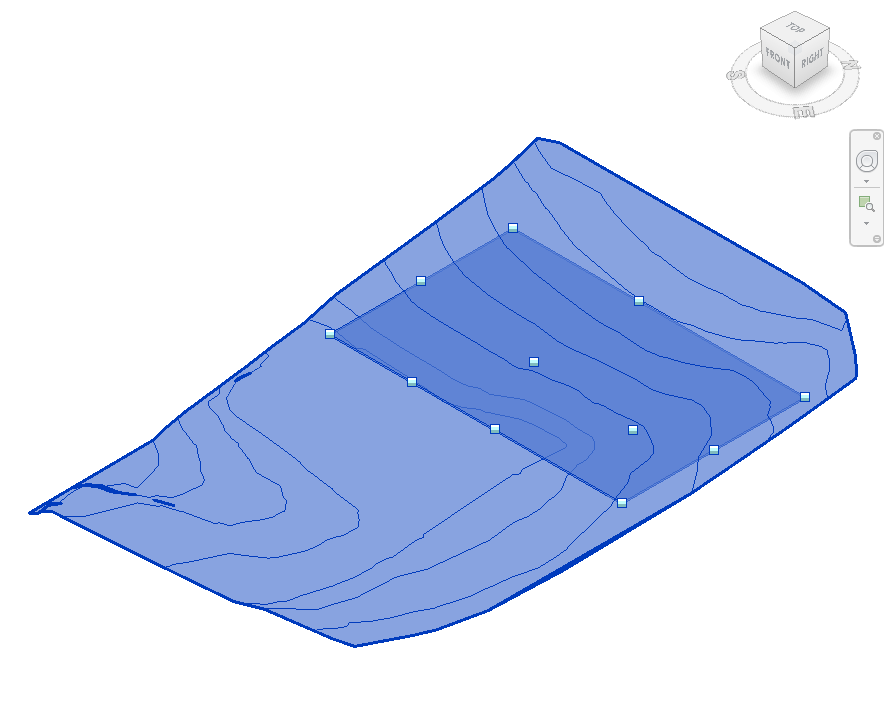
The Floor to Follow Topography tool automatically modifies floor or roof vertices to conform to the elevation of topography surfaces or toposolids. This powerful tool enables quick site-responsive design by adjusting slab shape editor points to match terrain elevations.

Table of Contents
- Key Features
- Requirements
- Step-by-Step Guide
- Tips and Best Practices
- Common Use Cases
- Troubleshooting
Key Features
- Automatically adjusts floor vertices to match topography elevation
- Works with both floors and footprint roofs
- Supports Topography Surfaces (all versions) and Toposolids (Revit 2024+)
- Processes all slab shape vertices automatically
- Enables slab shape editor if not already active
- Real-time progress tracking with progress bar
- Can be rerun after adding additional shape points
- Intelligently finds intersections above and below starting points
Requirements
Pre-requisites
-
Active 3D View
- Tool must be run from a 3D view
- Cannot run from plan, section, or elevation views
-
Selection Requirements
- Must select both:
- One topography surface OR one toposolid
- One floor OR one footprint roof
- Cannot select multiple floors/roofs simultaneously
- Cannot select multiple topographies simultaneously
- Must select both:
-
Floor/Roof Requirements
- Floor/roof must not be controlled by slope constraints
- Slab shape editor must be available (will be enabled automatically if disabled)
- Floor must have shape points (corners or added vertices)
Supported Elements
Topography Types:
- Topography Surface (all Revit versions)
- Toposolid (Revit 2024 and later)
Floor/Roof Types:
- Standard floors
- Footprint roofs (pitched roofs by footprint)
Step-by-Step Guide
Basic Workflow
-
Prepare Your Model
- Ensure you have a topography surface or toposolid in your project
- Create or place your floor/roof element
- Add shape points to the floor if needed (you can add more points later)
-
Switch to 3D View
- Navigate to any 3D view in your project
- Ensure both the topography and floor/roof are visible
-
Select Elements
- Select the topography surface/toposolid
- Add the floor or roof to your selection (Ctrl+Click)
-
Run the Tool
- Go to the Bonus Tools tab
- Click Floor to Follow Topography

-
Monitor Progress
- Progress bar displays current processing status
- Shows "Status: X of Y" for vertices processed
- Can cancel operation at any time
-
Review Results
- All vertices will be adjusted to match topography elevation
- Floor/roof now conforms to terrain
Adding More Points and Rerunning
One of the key features is the ability to refine results:
- After initial run, switch to a plan or section view
- Edit the floor/roof shape and add additional vertices where more detail is needed
- Return to 3D view
- Select topography and floor/roof again
- Rerun the tool - only new points will be adjusted while existing points maintain their elevations
Tips and Best Practices
-
Start with Corner Points
- Initial floor/roof will have vertices at corners
- Run tool first, then add intermediate points for refinement
- This gives you control over level of detail
-
Use Appropriate 3D View
- Ensure topography is fully visible in 3D view
- View orientation doesn't affect results but helps verification
- Consider creating a dedicated 3D view for this workflow
-
Strategic Point Placement
- Add more points in areas with significant slope changes
- Fewer points needed on flat areas
- Points along edges define the perimeter conformation
-
Multiple Iterations
- Don't try to add all points at once
- Run tool, review results, add points where needed, rerun
- Iterative approach gives better control
-
Check for Slope Constraints
- If tool reports "Is the Floor controlled by a Slope?", check properties
- Remove slope constraints before running tool
- Tool cannot modify floors with active slope constraints
-
Level Awareness
- All modifications are relative to the floor/roof's host level
- Changing level elevation will affect final positions
- Consider level placement when setting up floors
-
Save Before Running
- For complex floors with many vertices, save your work first
- Processing can take time on large datasets
- Allows easy recovery if results are unexpected
Common Use Cases
Site Pad for Building Foundation
Scenario: Create level pad matching existing terrain
- Create floor at approximate site elevation
- Extend floor beyond building footprint
- Add vertices at regular intervals
- Run tool to conform to topography
- Use as reference for cut/fill calculations
Sloped Parking Area
Scenario: Parking lot following natural terrain
- Sketch floor outline matching parking area
- Add vertices along drive aisles and at intersections
- Run tool to match topography
- Refine by adding points in slope transition areas
- Use for drainage analysis
Roof Garden Platform
Scenario: Elevated platform conforming to terrain
- Create roof element at desired height
- Sketch perimeter following site contours
- Add shape points for detailed conformation
- Run tool to adjust to topography below
- Modify offset if needed for clearance
Terraced Site Development
Scenario: Multiple platforms at different elevations
- Create separate floor elements for each terrace
- Position at approximate elevations
- Run tool on each floor individually
- Adjust shape points between runs for refinement
- Use for grading and retaining wall design
Path or Walkway
Scenario: Pedestrian path following terrain
- Create narrow floor element along path route
- Add vertices every few meters
- Run tool to conform to topography
- Use as guide for path grading
- Extract elevation data for construction documents
Troubleshooting
"Please go to a 3D View before running this tool"
Problem: Tool won't run Solution:
- Switch to any 3D view in the project
- View must be ViewType.ThreeD
- Cannot run from plan, section, elevation, or schedule views
"No topography or floor found"
Problem: Tool can't identify required elements Solutions:
- Verify you've selected exactly one topography/toposolid
- Verify you've selected exactly one floor or footprint roof
- Check selection before running tool
- In Revit, use Tab to cycle through overlapping elements
"Cannot Modify Sub Elements. Is the Floor controlled by a Slope?"
Problem: Slab shape editor unavailable Solutions:
- Check floor/roof properties for slope constraints
- Remove any slope arrows or constraints
- Ensure floor type supports shape editing
- For roofs, verify it's a footprint roof, not an extrusion
Progress Bar Freezes
Problem: Progress bar appears stuck Solutions:
- Large number of vertices takes more time - be patient
- Each vertex requires ray casting calculations
- Check Output Dialog for error messages
- Can click Cancel button to stop processing
Vertices Not Moving
Problem: Floor remains flat after running Solutions:
- Ensure topography is visible in the active 3D view
- Check that rays are long enough (100 units should be sufficient)
- Verify floor vertices are within topography bounds
- Review Output Dialog for specific error messages
Points Moving to Wrong Elevations
Problem: Some vertices adjust incorrectly Solutions:
- Check for overlapping topography surfaces
- Ensure only one topography is selected
- Verify 3D view doesn't have visual overrides affecting geometry
- Consider topography surface quality (may need more detail)
Transaction Errors
Problem: "Error opening the excel file..." or transaction failures Solution:
- This message is incorrect for this tool (copy-paste error from another tool)
- Look for actual error messages in Output Dialog
- Check Revit warnings for transaction rollback messages
- Ensure project isn't corrupted
Need Help? Contact support or refer to additional Bonus Tools documentation.
Thank you for using Bonus Tools - Floor to Follow Topography!